Filament changes can create vibrant models without any need for painting or post processing
Changing filament mid print requires modification in our Slicer as well as hands on work to perform the actual change. This can seem daunting but this quick guide you should give you the primer you need to be successful. Today we’ll be using the slicer CURA.
February 1st, 2022
Before we begin I should note NOT ALL PRINTERS are capable of out of the box filament changes. Your printers firmware needs to be setup for such a command. How can you tell if your printer is capable? If you have access to your firmware’s configuration files you could verify if it’s been enabled. If not, you just need to go through the steps below and hope it works.
This color changing journey begins in our slicer, and today we will be using Ultimaker CURA
to perform the color changing operation. While I don’t have extensive experience with
other slicers, like SuperSlicer or PrusaSlicer, the process we go over below should be
similar in nature across slicers.
The first thing we need to do is choose a model to color change. Now this XYZ cube I have
selected isn’t flashy but it will act as a great building block for us to learn from. Where we
choose to perform a color change is completely our choice, there’s no rule to it, but in
general your model will dictate where you want it to occur. In this example I want a color
change to happen right where that red line is. The problem is I am not sure what layer
number that is, and we need the layer number for the color change command. So I will
slice the model, then use the timeline tool (found in the PREVIEW tab) to find what the
layer number is.
Inside the Preview tab we now see a picture of our sliced XYZ cube.
To the right of the
model is the Timeline Tool, and we can use this to
scroll through each layer of the model
(the timeline). The number
above the bar is the current layer number.
I drag the bar down until I find the point at which I want the color
change to occur. Where
the change occurs is my preference, there's
no rule to it. I stop at the layer I want my
filament change to happen,
and I see from the bar on the right this is layer #51
Now equipped with our layer number we can add a ‘post processing’ script that will handle
the filament change within our G-code.
1.) Find the Post Processing menu
2.) Choose to ‘add a script’
3.) Add a filament change script
Depending on your version of Cura you may not have this option.
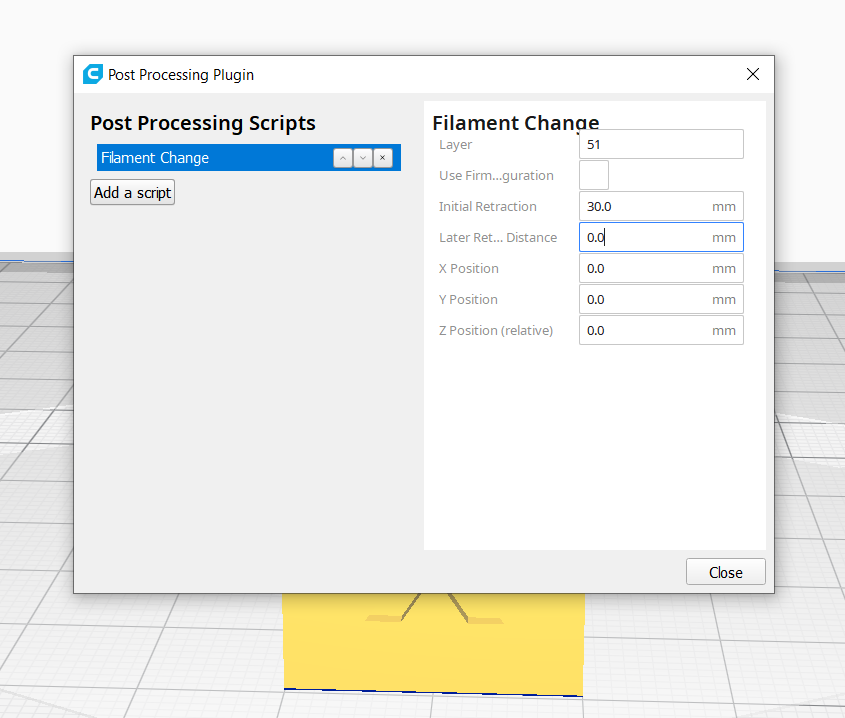
This menu is where we will input the parameters for the filament change. The different boxes have the following effects:
LAYER : this is the layer where the filament change will occur. The filament change is activated before this layer begins printing. If you are performing multiple filament changes, you can separate each layer with a comma (3, 14, 21). We now add the layer we want to perform the change at, layer 51.
USE FIRMWARE CONFIGURATION : checking this box will override any parameters underneath it and will rely on firmware settings for the filament change. If you are unfamiliar with your firmware configuration I would recommend leaving this box unchecked.
INITIAL RETRACTION : the distance in millimeters the printer will retract filament before it moves the printhead away from your model.
LATER RETRACTION DISTANCE : the distance in millimeters the printer will retract the filament after the print head has parked. I recommend setting this number to 0. I prefer to hand retract the full length of filament. Sometimes when the machine retracts the full length of filament it can loosen the filament still on the spool, causing it to knot.
X POSITION : the park location for the print head along the X axis, leaving it at 0 will bring it closes to it’s endstop.
Y POSITION : the park location for the print head along the Y axis, leaving it at 0 will bring it closes to it’s endstop.
Z POSITION : the park location for the print head along the Z axis, relative to' it’s current location.
NOT PICTURED - RETRACT METHOD : this is the g-code command sent to the printer to perform the filament change. By default it should read - MARLIN (M600 U) - if that is not selected for you, select that option now.
After inputting your information click the ‘close’ button which saves your settings.
After closing the filament change script and returning to the Prepare tab, a new icon appears. This small box indicates that one or more post processing scripts are being applied to our model. We can now ‘Slice’ our model once more, this time with the post processing script having been enabled, and then export that file to our printer. It should be noted that after slicing there is no indication in the ‘Preview’ tab, or any other menu, that the post processing script is enabled. The only indication is the small box next to the ‘slice’ button.
If we want to double check that our filament change script has been applied to the model, we can review the g-code file before we export it to our printer. In the attached photo the file named 'practice' is the g-code file for the cube I just sliced. This is what we put on our SD cards and the printer reads. I can open it and double check at layer 51 a change occurs.
And here it is, the M600 filament change. You'll also notice the change is occurring at layer 50 and not layer 51, that is because the first layer of the g-code is layer 0, not 1. So each layer is one behind what we think it would be, but we don't have to worry about that, the CURA script accounts for it.
Before we begin the print, let’s consider one more idea. We can place a small cube somewhere on the build plate closer to the origin than the selected model, and this cube will act as a purge cube. These colored axes represent the origin of the printer, when gcode is sliced CURA will print models that are closer to the origin first. Next to the XYZ cube is a plain CUBE that will act as a purge cube. After we perform the physical color change, often the next time the nozzle gets over the print it will either have extra filament dangling or not enough filament coming out. This can mar that small portion of our final print. The cube we have added will be printed on first, so any damage or purged filament will be deposited on this PURGE CUBE and our model should be printed without imperfection. So let's slice the model again and make sure our purge block is being printed on first
We’re looking back in the Preview tab, and this time we will be using the LAYER PREVIEW bar. This one is at the bottom of the screen. This bar shows how this layer is going to print, the left side of the bar is the LAYER START and the right side is the LAYER END. So let's scroll to the layer start and see what prints first.
Here we can see we are near the beginning of our printing layer, and the purge cube is being printed on first - the highlighted portions are lines already printed - Then we scroll ahead to see when the XYZ cube will print
This is perfect! Our purge cube is printed first and our XYZ cube is printed last. This way, any excess filament or print artifacts that accompany our filament change will work themselves out on the purge cube first, and leave our final model intact! Lastly we don't need the PURGE CUBE to print any further after the color change, we only need it for the first layer of the color change, after that we would be wasting filament. So we do a small amount of math. I am printing at 0.2mm layer height, the layer we are changing at is 51, so 51 x 0.2 = 10.2mm that's the height of our 51st layer. So we can select our purge cube and using the SCALE tool, change it's height.
Here I enter 10.2 as the Z height of the purge cube, and I make sure Uniform Scaling is unchecked, or CURA will also scale the X and Y values. At this point we could scale the X and Y values of the purge cube if we wanted to save on filament. I usually make the cube 10mm by 10mm in the X and Y directions to save on filament while still having enough surface area to purge filament.
Finally, we slice the model, go into the Preview Tab, scroll down to layer 51, and then preview the beginning of this layer to make sure the purge cube is being printed on. This is a sanity check to make sure we did the math correctly and the purge cube is as tall as it needs to be. Then finally, we can transfer the sliced file from CURA to our printer!


