
Getting started with Klipper:
You just made the jump to Klipper, the printer works, but things are.. different.. With Klipper you’ve now been given (nearly)complete control of your printer. You can make changes on the fly, you can create macros to automate or help with certain tasks, and you’ll be getting realtime information from your printer that you’ve never seen. But before you start cruising it's important to look back at the basics. Most of that comes in the way of basic calibrations. Those are everyone’s favorite words I know. You may have already calibrated your printer through your previous firmware, and if you did that’s great! You can use a lot of that information and save time, but even then, there are still some function tests you’ll need to perform. Klipper operates differently than Marlin, which is the firmware most everyone migrated from, so getting the basics operating properly will put you on the right path on the journey to GET GREAT PRINTS!
If I got you excited with my rabble-rousing I apologize, because before we get into any calibrations or function checks let’s take a tour around your new ‘Front End’. That’s the name given to the way you will be interacting with your printer.
You used to use a screen. You started prints, changed temperature, and a whole host of other functions through it. You no longer have a screen to use*, you’ll be using a web page for all those tasks and more!
The two front end options are Fluidd or Mainsail, and they are very similar (I won’t be covering OctoPrint). For this tour I am using Fluidd, but if you’re using Mainsail most of this information should be identical or similar enough to be cross compatible.
*Klipperscreen is a screen option but I will not be covering it in this article. Just know that some screen options do exist

The Front End
PAGE CONTENTS
This is the webpage you visit via the IP address that was provided during your Klipper installation. Like most applications nowadays it has several ‘pages’ or ‘screens’ that you can visit to access various features of your 3d printer. I am including a 0-4 scale of how often I visit/use each of the pages.
0 = barely ever
4 = I use it most of the time.
All the scale is intended to do is let you know which pages you need to focus on as a new user.


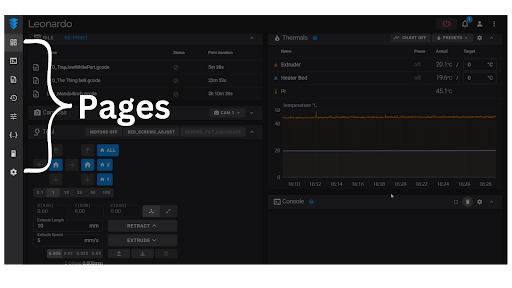
This is the front end and the first screen it will open up to. From here we can navigate to all the different pages/sections
The sidebar along the left go the screen allows navigation to all of the different Pages of Fluidd. Each page is composed of different aspects of your 3d printer. The section to the right (darkened in picture) is the page and all its contents.
Home: 4 (home sweet home)

The top tab is the HOME page. It’s the screen we are currently looking at and it contains most of the features you would expect to be on a home screen. Temperatures, print files, movement of the printhead, etc. This is the menu you will spend the majority of your time on. After the overview I will cover this menu in-depth.
Console: 0 (this is available on the HOME screen)
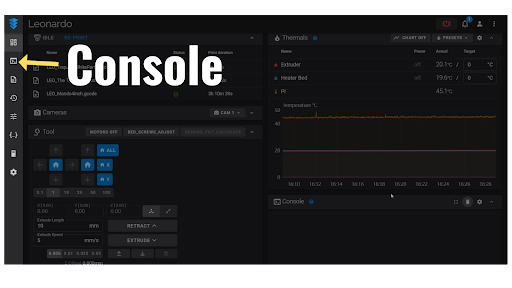
The page with the icon of a forward arrow and an underscore is known as the CONSOLE. This page is a full screen version of the console that is available on the HOME page. The console is a terminal line where you can communicate with the 3D printer by inputting commands.
The commands can be sent as gcode (G28 = home all axes), or as a macro (a name given to a set command of gcodes). The 3d printer will also output important information through the console for us to read [insert example]. If there is an error while printing the console line will usually have a message related to it that we can use to diagnose the problem. You will be using the console a good deal of the time, so don’t let the low visiting score fool you, it’s because I don’t use this dedicated page to use it and opt to use the version the HOME page offers.
Jobs: 0 (this is available on the HOME screen)
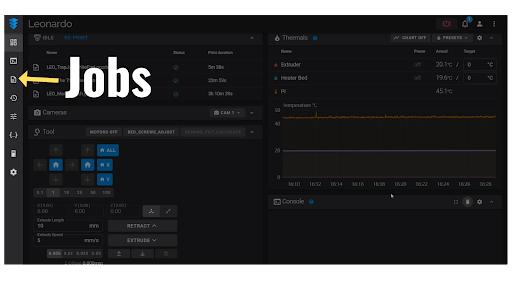
The page with a bend in the upper corner of the icon is the JOBS page, which can be better described as the ‘available print files’ page. This page lists all of the print files you have uploaded and saved to the printer. Instead of using an SD card (as you did with Marlin) all print files will be sent wirelessly to the printer and stored on the memory of the host device*, allowing the print files tobe re-printed through the click of a button.
Just like the Console page, this feature can also be found on the Home page for easier access. You’ll be selecting files to print often (I’d say about everytime you print lol), so don’t let the low visiting score fool you, it’s because I don’t use this dedicated page and opt to use the version the HOME page offers.
*(host device is the device used to run Klipper - i.e. Raspberry Pi, Quadra, PC, etc.)
History: 0 (don’t look back it’s just the past)

The circular clock-looking icon is the page for HISTORY. This page houses information about the files you already printed. Information such as completed print time, filament usage, and file size amongst others. It’s not a page I navigate to often, but it is interesting to be able to keep track of certain information.
Tune: 2 (important for certain calibrations)

The icon that looks like adjustment mixers represents the TUNE page. If this is your first viewing of this page it will look mostly empty, but it is a very important page.
This page houses the virtual mesh you create by either using a bed probe or through manual mesh leveling. The mesh is a virtual map of the topography of your bed, and this page visualizes that for you. It also gives height information that can be used to determine how well the mesh will be applied (i.e. is the tolerance of the mesh points too far off from one another to be effective. A tolerance of 0.2 or below is desirable). If your printer has a filament runout sensor the feature to turn it on or off can also be found here.
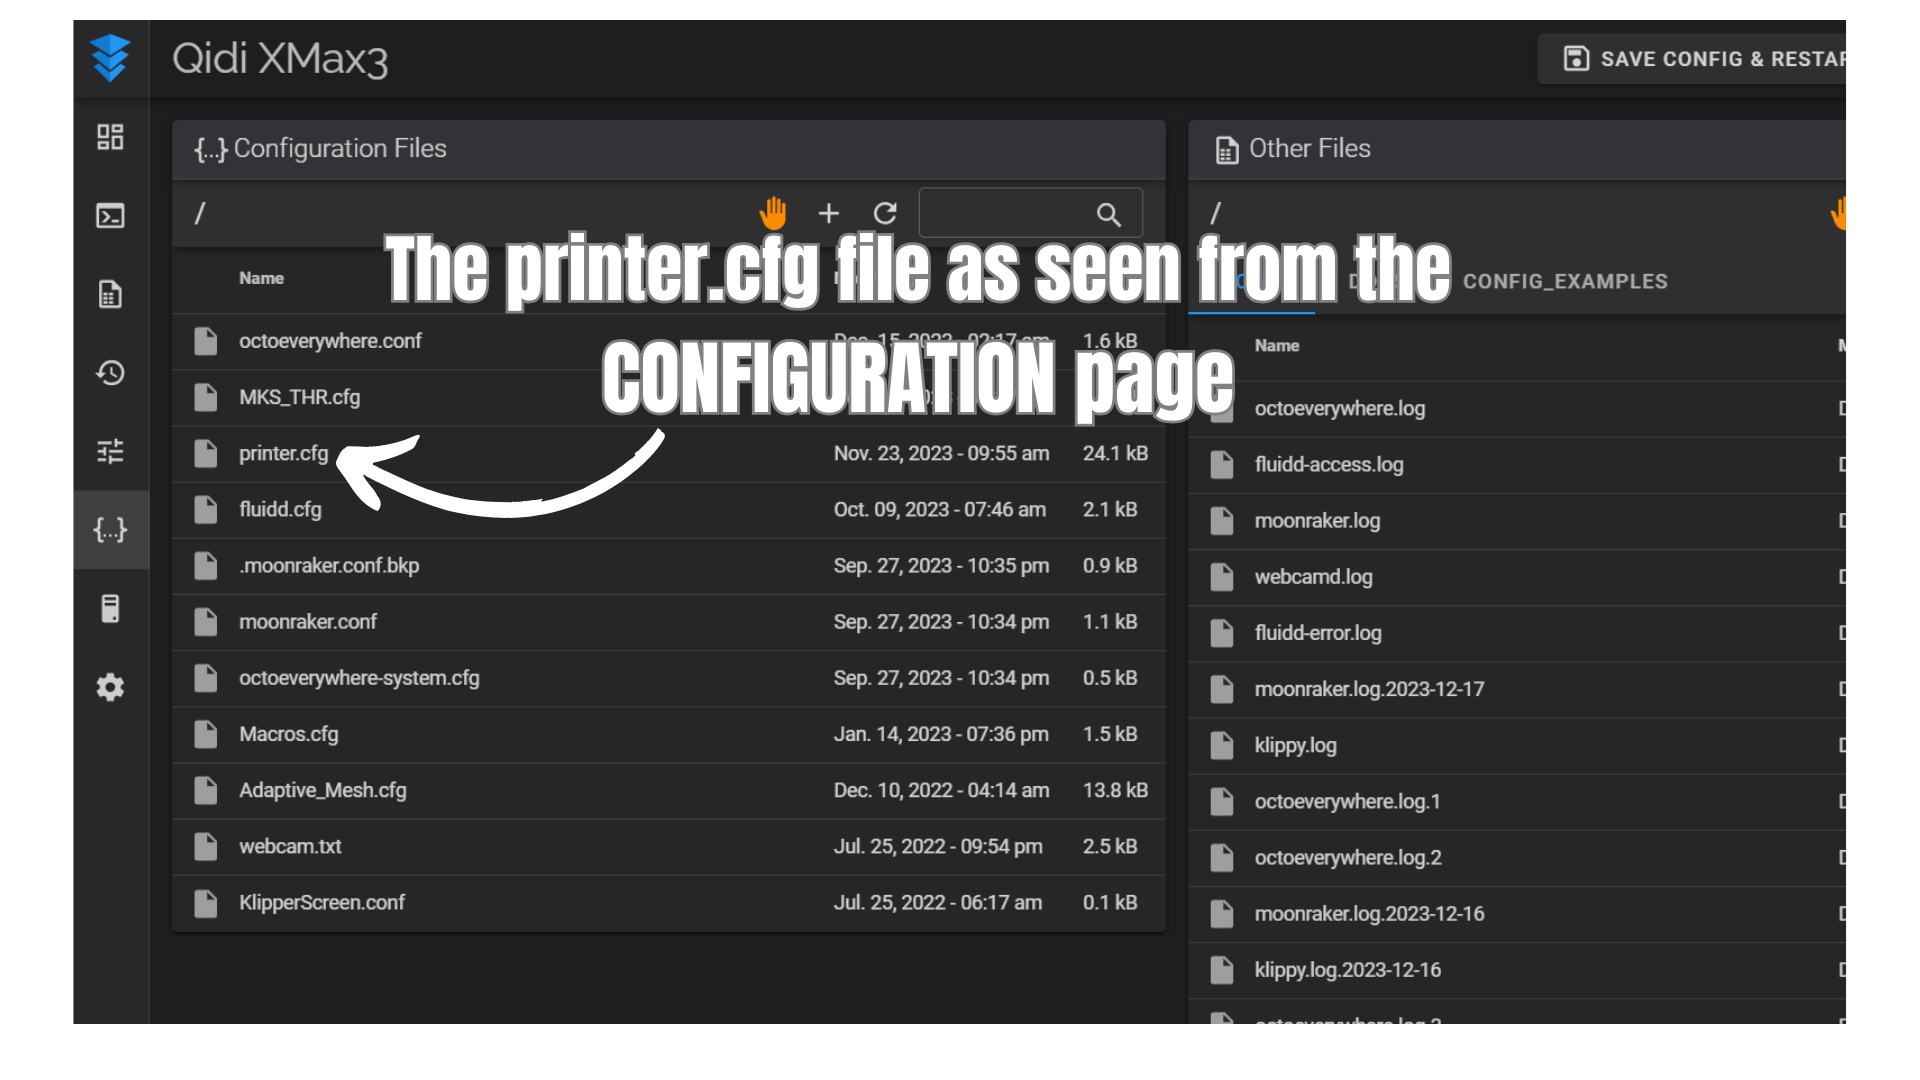
Configuration: 4 (this is where the treasure is buried)

The curly brackets icon is where the CONFIGURATION page can be found.
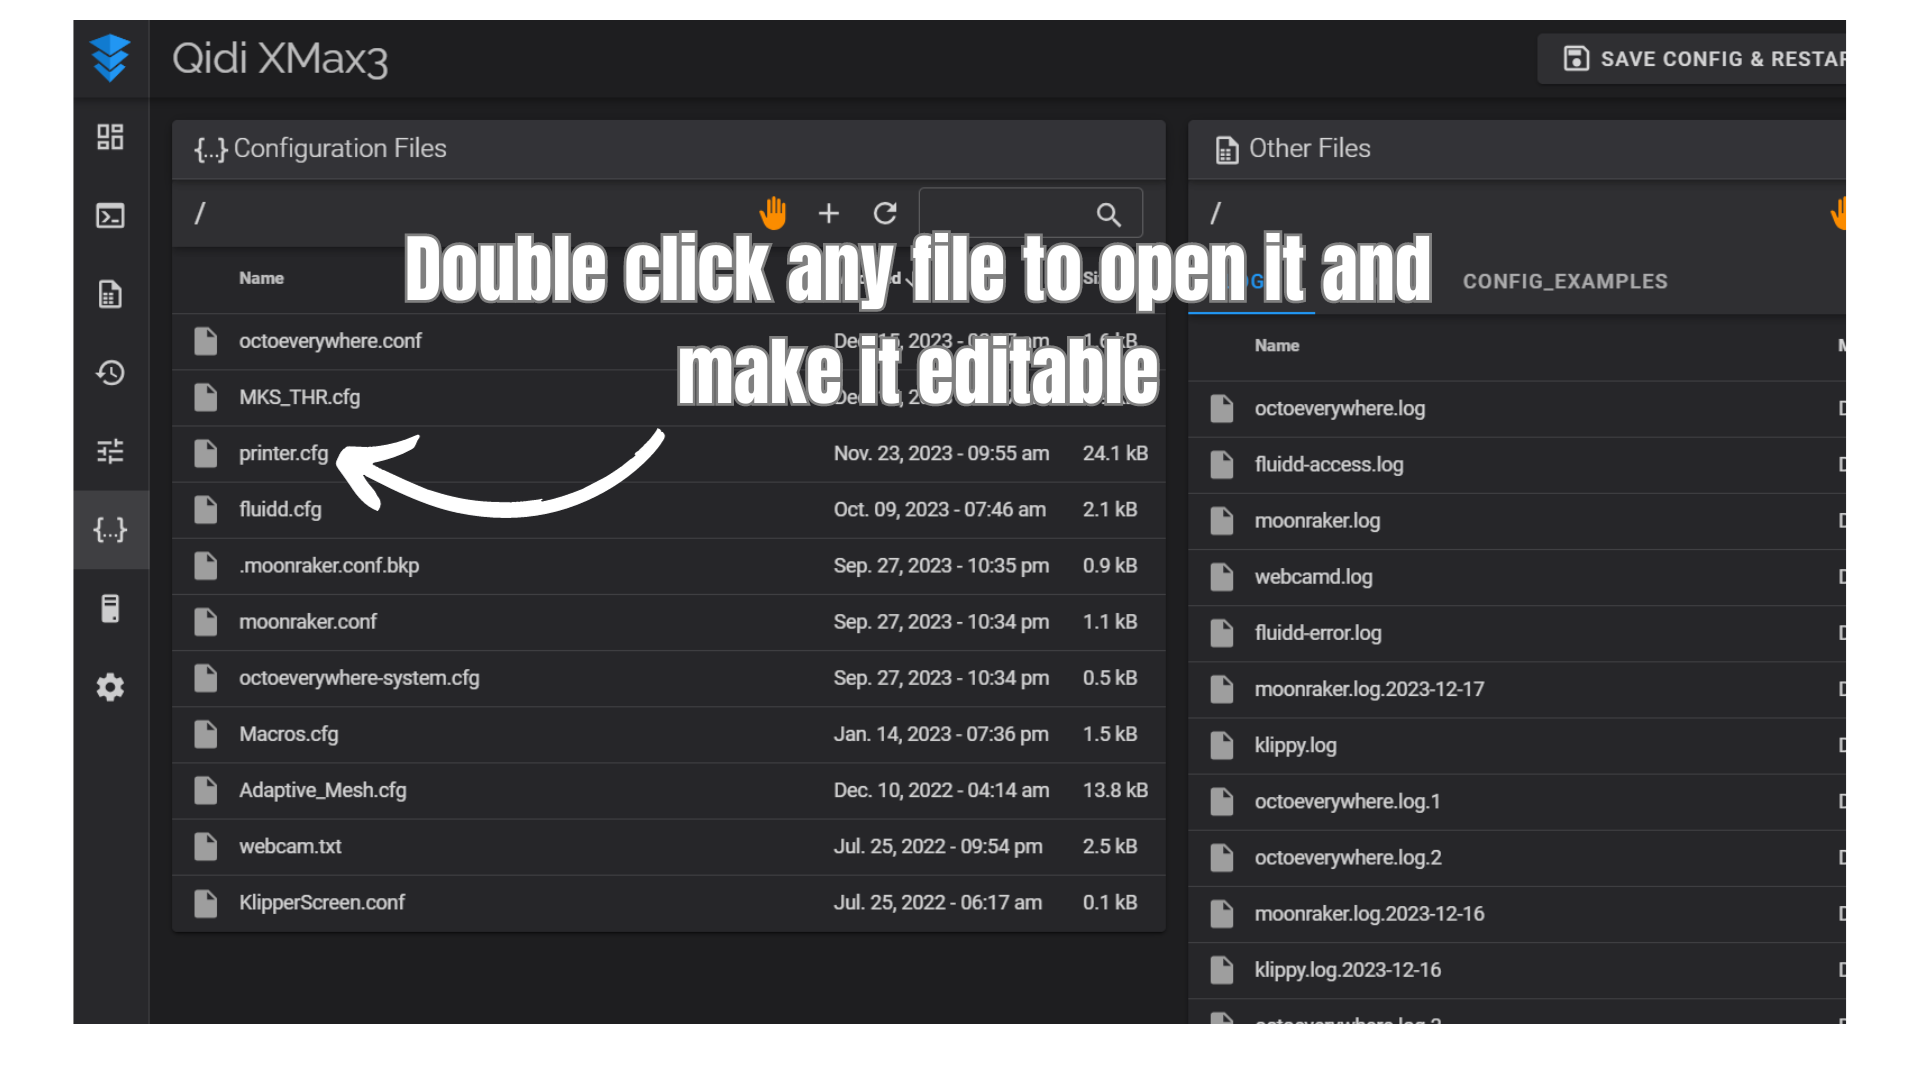
This page is a list of files and folders Klipper is using to run your printer. All files ending in ‘.cfg’ and ‘.conf’ are configuration files that Klipper is reading to operate different areas of your 3d printer and peripherals (cameras, etc). The most important of these files is the printer.cfg file. The printer.cfg file is a text file that contains all the pertinent information about your 3d printer. The concept of this file containing all important information can be tricky to understand when going from Marlin to Klipper, so it deserves its own section which I’ve added below (see 'what is a printer.cfg?), for now all you need to know is that this is probably the most important page, as it houses the most important data, your printer.cfg file. You will be spending a decent amount of time on this page as you make changes or additions to your printer, but you will get familiar with it quickly because there’s not many sections that you will be accessing.
Host Device: 3 (short and sweet)
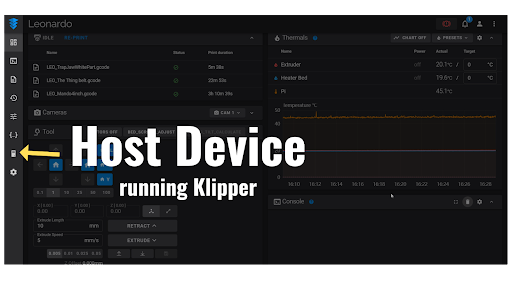
The PC tower icon is the page for your HOST DEVICE.
This page shows usage data for all the systems that your printer and Klipper need to run. That includes information for your front end (Fluidd/Mainsail), host device, mainboard, and the Klipper service. You can use this data to understand how different services are affecting the performance of your device. This is also the page where you will be Restarting your Firmware. Firmware restarts are an important Klipper topic that can be confusing to newer users, so I've included information on it under the 'what is a printer.cfg' section. For now all you need to know is that it is accessible from here. Firmware restarts may be required frequently (as you change things) so you’ll be visiting this page often, but it’s usually only to click a single button.
Settings: 2 (dash of paint here, touch of camera there)

The gear icon is where the SETTINGS page is located. This page allows you to customize and add features to areas of the front end.
When this page is opened it will show a bullet list of the options that are available, when clicking any of those options the page will be scrolled to the accompanying section. If you want to customize the name shown at the top of the front end or the color scheme, it can be done through this menu. With a name like Settings you may get the impression that you will be tweaking a lot of features from this menu, but most of them will be controlled by their own configuration files(.cfg //.conf). If you do add a camera to your setup you will need to visit this page and create that option. Then the module gets added to the home screen and can be viewed. As you add more modules/packages to your Klipper setup (timelapse for instance) those sections, when appropriate, will be added to this page to allow for customization. I usually visit this page when I add a new printer to Kipper, I customize the name and the theme, and then once again when I add a camera. Outside of that I don’t venture here that often.

That’s a general overview of the front end navigation. I could write 1000+ words on each of those pages, but I want to concentrate on only the two you will be using the most, Home and Configuration.
THE PRINTER.CFG FILE
It may sound silly that I am dedicating an entire section to a single configuration file, but that reinforces just how important this file is. Not only is the file important but the implementation of the file is unique to Klipper, Marlin firmware doesn’t operate this way. Let’s start with the word ‘firmware’
Firmware is the software(code) blueprint that provides instructions necessary for the hardware(physical) of the 3d printer to operate. In basic terms it’s the operating system that controls the 3d printer; it’s the ‘brains’. The majority of 3d printers on the market come stock with Marlin firmware.
Marlin Firmware Has all of the 3d printer’s features embedded within its firmware (bed size, maximum and minimum temperatures, filament runout information, etc.). When the firmware is created (compiled) all those aspects are joined together to create a firmware file, often known as a dot-bin file (‘.bin’). That firmware file is then flashed (uploaded) onto the mainboard of your printer, and all the information contained within the file is used for the printer to operate.
Whenever you need to make a change to the printer, for instance if you want to increase the maximum hot end temperature, you need to create(recompile) a new version of firmware. To do that you would use additional software (usually Platform IO) to edit the original firmware files. After editing the files you re-compile and then flash the firmware onto your 3d printer.
The process is what I would consider tedious. Especially when you consider that for every time you recompile firmware you need to make sure you’re compiling all the correct data. For instance if you adjusted the maximum hot end temperature but forgot to keep the correct filament runout sensor information, you would need to start the recompile process again after you discover the omission (which could be days or weeks later).
Klipper Firmware does not operate the same way. Klipper does not have the features of the 3d printer tied to the firmware. When you flash Klipper firmware you’re flashing the libraries, code, physics, kinematics, and other information Klipper uses to operate the 3d printer. You ARE NOT flashing information about your 3d printer. So how does Klipper get information about your 3d printer? The printer.cfg file!
The printer.cfg file(printer configuration) is an editable text document that Klipper reads to know the features of your 3d printer. Features like the maximum and minimum temperatures, maximum print volume, number of extruders, and all the operational data. Klipper does not embed these features within the firmware, it instead does it client side with this document. Because Klipper has this sort of compartmentalization, it allows you to make changes to your 3d printer quickly and easily. You won’t need to recompile or reflash firmware! Each change you make is as simple as editing a document and hitting Save!

Because Klipper is relying on the printer.cfg file to operate your 3d printer it is the most important file to maintain. Let’s take a look at an example configuration file.

When opening up a brand new printer.cfg it will look different than my example. This should not matter, as most all the sections are the same and the concepts discussed here are universal, which is one of Klipper’s strengths.
Let’s take a look at the areas of the configuration file:

This is the file name (printer.cfg) and it should never be changed. Klipper will always be looking for a file named ‘printer.cfg’. If you ever rename this file and there is no printer.cfg file to replace it you will get an error and will not be able to use the printer.
These are commands for the document, and most notable is the “Save and Restart” command. In order for the changes made in this file to take effect the firmware needs to be ‘restarted’. The Save and Restart button saves the file in its current form and restarts the firmware, updating it. Whenever the firmware is restarted all services are halted and then restarted, which means if you’re in the middle of a print it will cancel and stop in place. So make sure you only restart:
before a print
after a print or
after any other operation has been completed (ie. probing for a new bed mesh)
If you want to exit without saving hit the Close button, and if you want to save changes without restarting the firmware (because you are in the middle of a print for example) use the Save button. The information will be saved but not applied until the next time the firmware is restarted.
This is the body of the file and where all the information about the printer will be stored. Klipper uses the computer language Python, and each configuration files is evaluated using the Jinja2 templating language. That means all of the information contained within this document needs to adhere to the Jinja2 templating, mostly that means indentation and spacing are important.
This DOES NOT mean you need to be a high level programmer to make changes to your printer. Some users will never know what ‘programming language’ Klipper uses, and they don’t have to.
You will rarely if ever construct your own printer.cfg from scratch. These files are usually pre-made for you to copy and paste, and they are usually formatted correctly. Sometimes when you add a section (via copy and paste) the formatting gets corrupted, for example every other line is shifted down a line, and the section will not work. So be mindful of that, and know that Klipper has onboard color-coded text to help point out errors. The colors in my documents are: white, blue, light blue, and orange. Your colors may be different, which is fine, so long as the same sections are color coded.

At the top of the example file you see text enclosed within brackets [ ] . Any text that is closed off by brackets [..] denotes a Section. Some sections have further text underneath them, while others don’t require any. Let’s look at the top one:
[include inputShaper.cfg]
This section is utilizing the powerful keyword ‘include’. This keyword includes, or incorporates, the document that is within the brackets. In this example the document inputShaper.cfg is being “included” in the printer.cfg file.
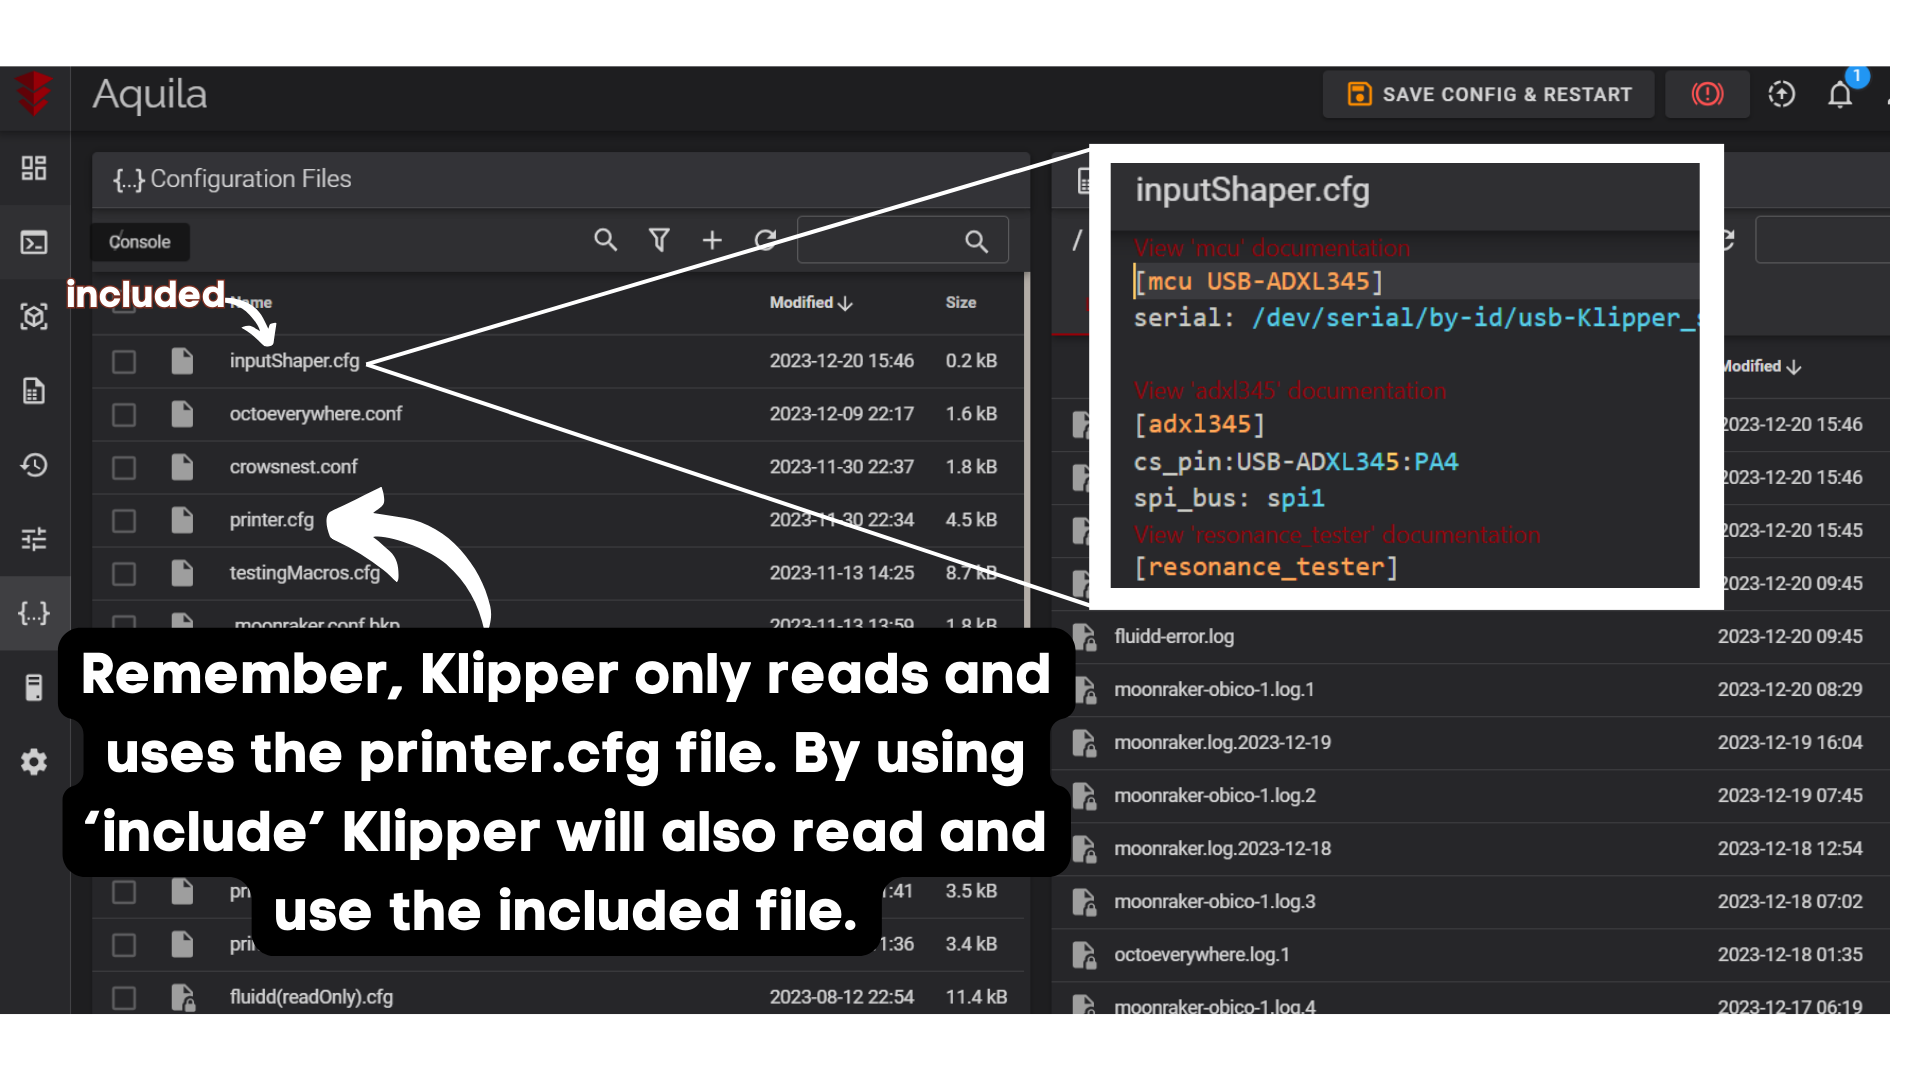
Using the ‘include’ function is a great way to help keep your printer.cfg clean and streamline. As you add features to your 3d printer they will need corresponding sections to work. Instead of adding them all within the printer.cfg, and scrolling endlessly to find the correct section, you can create an alternate configuration file and include, or ‘pull’, that file into the printer.cfg with the include keyword. While this technique is powerful it’s not important for newer users of Klipper.
All of the Include sections have no other text below them, meaning all the necessary information is contained within the section title. Let’s take a look at the section [virtual_sdcard] because that does have some text below it, signified by the alternate color (white).
Here again we have a section, and we can tell because it’s closed in brackets. The section name is virtual_sdcard(represented in orange). This section deals with the folder where gcode files (print files) are located*. This time underneath the section title we have more text, and this text is in white.
path:
The left side of the line begins the command and ends in a colon. The line ‘path:’ is Klipper’s way of asking us, the user, what folder we are housing our print files in. It’s not good enough just to add the exact folder we are using, we need to entire folder pathway, from the source to the final folder being used.
/home/quadra/printer-2-data/gcodes
The information to the right of the colon is the folder structure where Klipper will be looking for the print files. All the information here is on the same line, as we remember the printer.cfg file cares about formatting.
Where did this folder, and the subsequent pathway, come from? These were created when you initially installed Klipper onto the Host Device. So you don’t need to track down the folder location, it will be provided (unless you’ve made some changes to it).
Why is it structured this way? That’s just how Klipper sets it up. If you are unsure about this or any section then you could click the blue text above the section name. This will bring you to a documentation page that explains the setup and implementation of the given section.
*You can see above the section, in blue text, the words ‘view documentation’. This is a clickable link that will direct you to the corresponding page of the Klipper documentation that deals with the given section. Each and every section has a link that will irect you to the appropriate section of the documentation. Another powerful tool that Klipper affords us as we learn this new firmware. If you have questions about the section, or aren’t clear on how it works, use this link to help you understand its usage.


Moving a little further down, we see the section that deals with the bed leveling probe, titled [bltouch]:
You can immediately identify it as a section because it’s enclosed in brackets
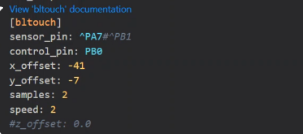
Underneath the section are several lines of text (white). These lines all fall within the [bltouch] section, and tell Klipper how you want the bed leveling probe to operate. Information such as the X and Y offsets as well as how many times to probe the bed per probing location (samples). How do you know how this section should be set up? How can you figure out what areas the bl touch section can cover? Click the blue link above the section and you’ll be brought to its corresponding documentation page. I’ve included it below:

The top portion has the section name and some information regarding the section as a whole
This area shows a ‘template configuration’ starting with the section name and underneath are all the attributes you can define. This is similar to how it will appear inside the printer.cfg
These are the definable attributes that are contained within the section. Meaning anything variable here (to the left of the colon:) can be used in the printer.cfg. There are some variables that must be defined(control_pin), and the section will dictate that “This parameter must be provided”. While others can be omitted and the default settings will be used(stow_on_each_sample) “the default is true”.