
Klipper, increasing accessibility through automation
…also did I mention you don’t have to level your bed ever again

3D printing can be a rewarding but tough hobby, whether it's performing calibrations, staring at prints hoping they don’t fail, or learning the variety of materials to print with; it can become overwhelming quickly. What can get lost in all that “information noise” is the accessibility hurdles some people may face. Particularly those users who experience physical, or other, limitations when it comes to maintaining and operating their 3D printers. While there’s always going to be some inherent physical labor involved with 3d printing, the emergence of newer (and arguably better) firmware, like Klipper, is beginning to use automation to bridge the accessibility gap.


What does Klipper offer us?

Klipper offers a routine labeled ‘screws_tilt_adjust’. This feature uses a bed leveling probe, like a BL Touch, to compute and compensate for the level of the bed. The process is performed through the console of the front end (i.e Fluidd or Mainsail), and once started, the bed probe takes height measurements at each of the four corners of the bed (above the leveling knobs), and then calculates the difference between them. Afterwards it will give you a calculation of how to adjust each leveling knob. Not only does it give you the amount of adjustment (in relation to a clock, ¼ turn, ½ turn, etc), it also tells you the direction to turn each knob! You don’t have to go around the bed attempting to feel resistance anymore, you can click a button and let Klipper do the work! Again, this feature seems like a niche add-on, a convenience to some, and it is, but even if bed leveling is an easy task you can benefit from this by cutting down on time. There’s also a small subset of users who are just plain bad at leveling their beds. That’s nothing to be ashamed about. There are some tasks that just don’t ‘click’ for some people, even with their best efforts, and this feature offers much needed assistance.
-
When ‘leveling the bed’, you take a feeler gauge and attempt to get the distance the nozzle is from the bed uniform at the four corners (above the leveling knobs). My method is to use a post-it note as a gauge, and then, one by one, go to each corner, put the post-it note between the bed and the nozzle, and attempt to get the ‘drag’ on the post-it note uniform. I don't do this once either, I go around the bed many times. In total this process takes me about 5-10 minutes to complete, and it should, bed leveling is an essential part to getting quality 3d prints, so being accurate is paramount.
[In this article I will be using the common phrase 'level the bed' but in actuality we are not leveling the bed. The process we perform attempts to align the plane of the bed and the plane of the nozzle, and this more correctly called tramming]
What are some issues you may encounter while manual bed leveling?
If you’re someone that levels their bed often you may be thinking what’s the big fuss? While it may be an annoying task how is it ‘physically demanding’? Well it can be in multiple ways.

physical
Depending on how your 3d printer is situated, it can be difficult to make it around the bed comfortably (or at all). Your arms and shoulders will be outstretched and under stress during the process. Your back will likely be strained the whole time while you go from corner to corner. If your printer is not accessible from the sides or the back this can be painful and frustrating. I suffer mild shoulder issues, and for me this process can become painful the longer it takes. Also, The ‘feel’ you need to get on the nozzle can be difficult for people with circulation issues in their hands, or other conditions that cause numbness or decreased feeling (neuropathy as an example).

mental
There are those of us with mental stressors that cause patience to be at a minimum and find this task trying. If you don’t put the proper amount of time and care into this procedure your prints (and likely overall experience) will suffer. So while this may be a ‘breeze’ to perform for some people, there are others that may struggle, and that’s where automation can help.

time
While you may not spend the better part of your day leveling your bed, any time you do spend on it is time spent not performing other 3d printing related things (probably another calibration). Being able to free up time should not be overlooked, as this process will literally do 99% of the work for you. Leaving you only with the task of turning a few knobs.. not too bad!
And all accessibility issues aside, leveling your bed is just usually not what most would call a 'fun experience', so anything that can take the load of that procedure off your schedule can be highly beneficial.
Let’s look at how we can set this feature up!

Installation
The feature ‘screws_tilt_adjust’ is a Klipper macro, which means for this to work we will be adding lines to the printer configuration file (aka printer.cfg). We start by adding the default macro framework to the printer configuration file.
for today’s article I will be using the Klipper front end Fluidd to demonstrate the steps, but this same process works just as well on Mainsail
On the printer's home screen find and navigate to the Configuration tab[1], and from there open the printer.cfg file[2].

Find some blank space between sections and paste in the following information[3]. This sample has generic data as placeholders. You will need to calibrate values for all the screw locations (screw1, screw2, screw3, screw4) and the diameter of the screw on your own printer(screw_thread). Save the printer.cfg and then make your way back up to the Home screen. (no need to firmware restart at this time)
[screws_tilt_adjust]
screw1: 10,10
screw1_name: front left screw
screw2: 100, 10
screw2_name: front right screw
screw3: 100, 100
screw3_name: rear right screw
screw4: 10, 100
screw4_name: rear left screw
horizontal_move_z: 10
speed: 50
screw_thread: CW-M4 #measure the diameter of your adjustment screw

Now find the coordinates for each of the four bed leveling screws as they relate to the position of the BL Touch not the nozzle -meaning place the BL Touch over each screw and use the current coordinates- There are four bed leveling screws, and they are numbered 1 through 4 (as labeled above in the sample macro).

From the Home screen of your printer’s front end, find the Tool section. This section moves the printhead around the build volume. Auto home the printer and afterwards you can move the printhead freely[4]. Still in the Tool section, use the movement commands and line up the bl touch probe tip so it is directly above bed leveling screw 1. To be more accurate you may need to lower the z axis or lower the bl touch probe closer to the bed(in the Console enter the command BLTOUCH_DEBUG COMMAND=pin_down)[5]. Once you’re satisfied with the location check the Tool section for the current X and Y coordinates[6].
note: This portion of the macro draws confusion from me, as most operations that require the bl touch to be used also need the exact coordinates of the bl touch, which requires you to obtain the nozzle coordinates and then subtract the X and Y bl touch offsets. This macro however will use the nozzles location only while the bl touch probe is over the screw.


Record this information somewhere as you will enter it in the screws_tilt_adjust macro at the conclusion. Continue the same operation for the remaining 3 screws moving the printhead around to each of the screws; move the probe into position, note the coordinates, and record the results[7].

The final measurement is the diameter of each bed leveling screw. The easiest way I have found to measure this is to use calipers around the exposed threads of the screw. Place the 'mouth' of your caliper on opposing sides of the screw threads, and then round to the nearest whole number[8]. In general these screws are usually 3mm or 4mm.


Once you are finished with all four of the screw locations, and the screw diameter, re-enter printer.cfg through the Configuration menu. Find the ‘screws_tilt_adjust’ macro, and under each of the screw locations (screw1, screw2, etc) overwrite the current data with the values you calculated. Then input the value you measured for the screw diameter under ‘screw_thread’[9]. Save and Restart your firmware for all of these changes to take effect. (you can Save and Restart directly from the printer.cfg while using single instances of Klipper. If using multiple instances you will need to Restart the firmware from the Terminal?? menu)

How to use
The macro is now ready to be initiated. Under the TOOL section you'll notice a new 'button' has been added(screws_tilt_calculate). The button will start inaccessible, because the printer needs to be homed before it can be used.[10] Home the printer, and when finished, click the screws_tilt_calculate button to initiate the automated bed leveling sequence[11]. The probe will take two measurements from each screw position and then provide a calculated output within the console (also on your home page)[12].


Let's break down the above output:
OVERALL MOVEMENT[13]
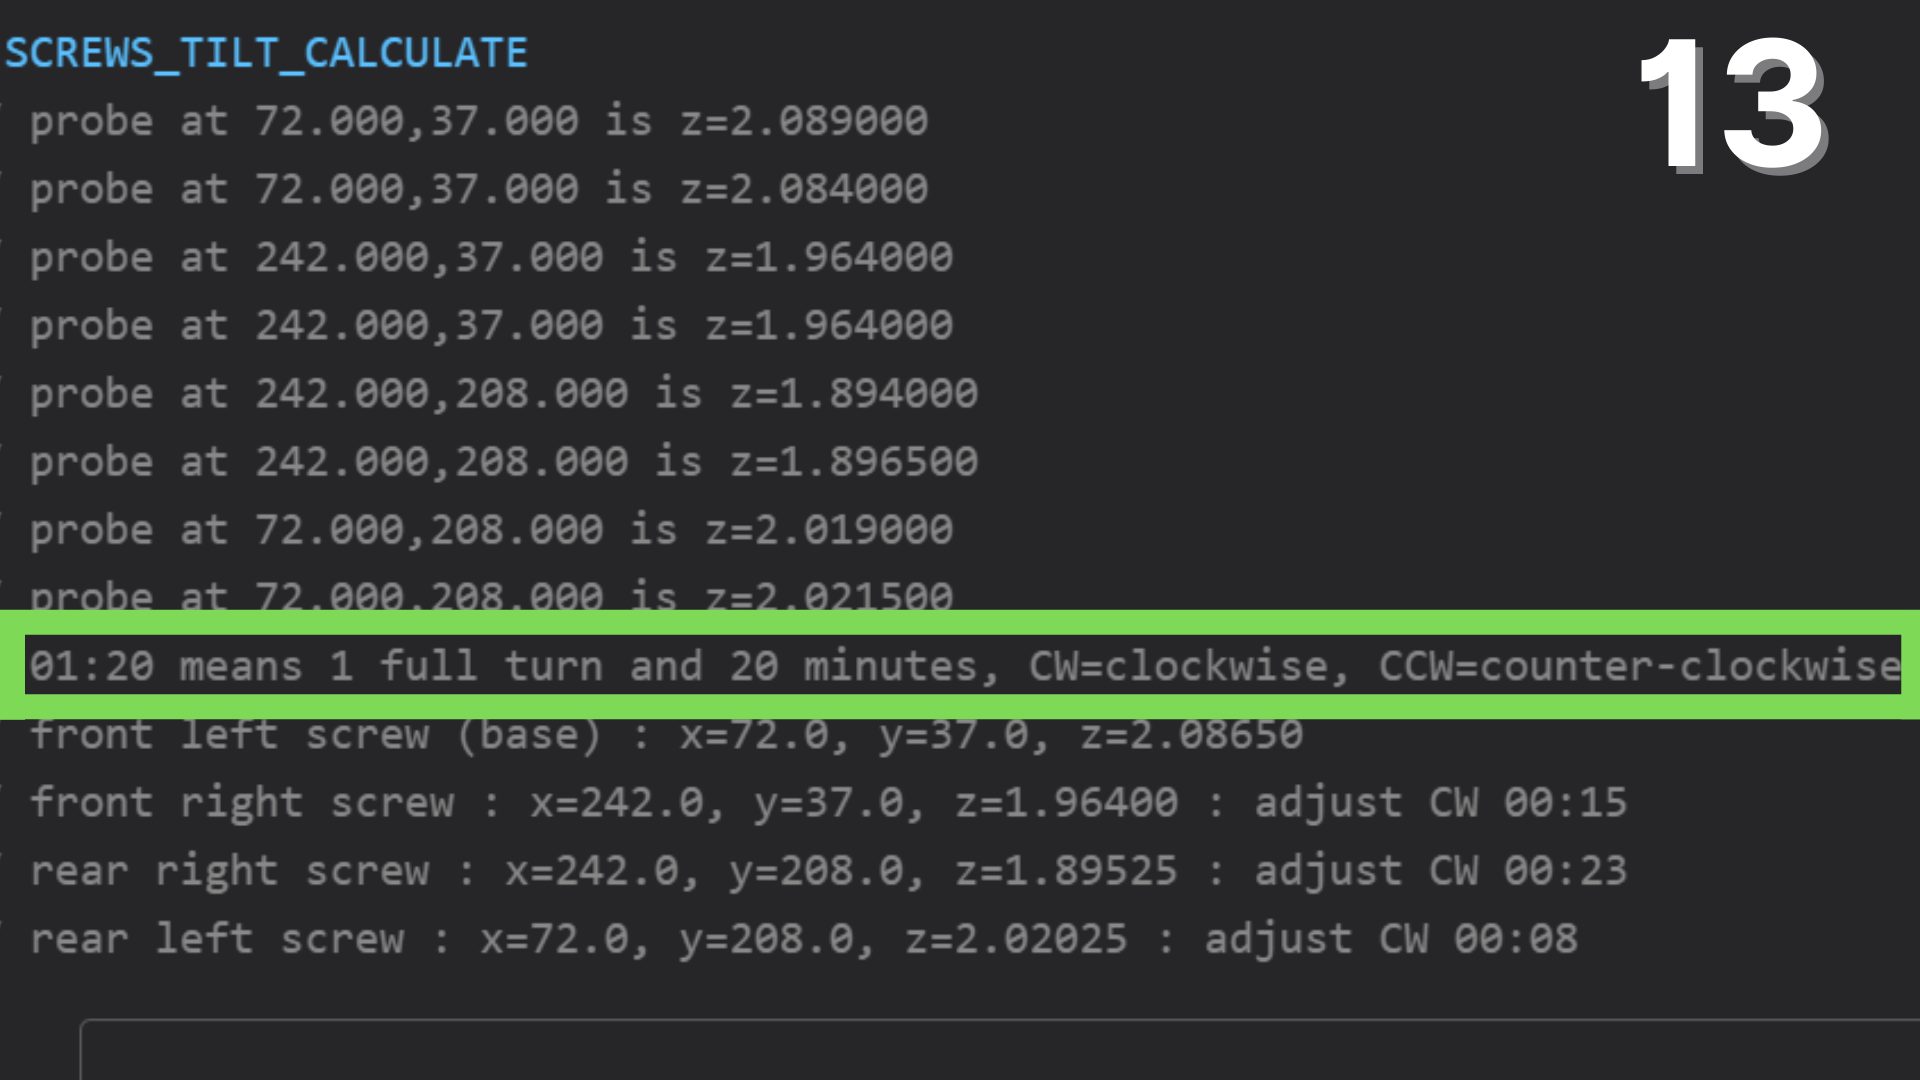
This first line sets an example and explains how the calculations are expected to be utilized. The amount of adjustment is given in the form of time (hour:minute) and the direction of movement is given in the clock face direction - CW= clockwise: spin rightward / CCW = counter-clockwise spin leftward - (as if you were looking down at the knob through the bed). A full rotation of a clock is 60 minutes (1 hour), so use that to determine how much to adjust each number when given in minutes.


front left screw (base)[14]

The front left screw (base) is Screw1. This will be used as the 'base' measurement, its height will be what all other screws are adjusted against. As such, you will never be adjusting Screw1.
front right screw[15]


This is the screw we know as ‘screw2’. Beside it the coordinates are given and then the amount of rotation needed to bring this section of the bed ‘level’. The direction of rotation for this screw is CW denoting to be turned clockwise. The amount of rotation 00:15 means this will need to be moved in 15 minutes of rotation. This rotation is rather minimal (and if you skip ahead you’ll notice the rest are as well), and according to the Klipper docs, any rotation at or under 00:06 minutes is within specs and does not need to be adjusted further. After this adjustment we may not need to make another!
rear right screw[16]

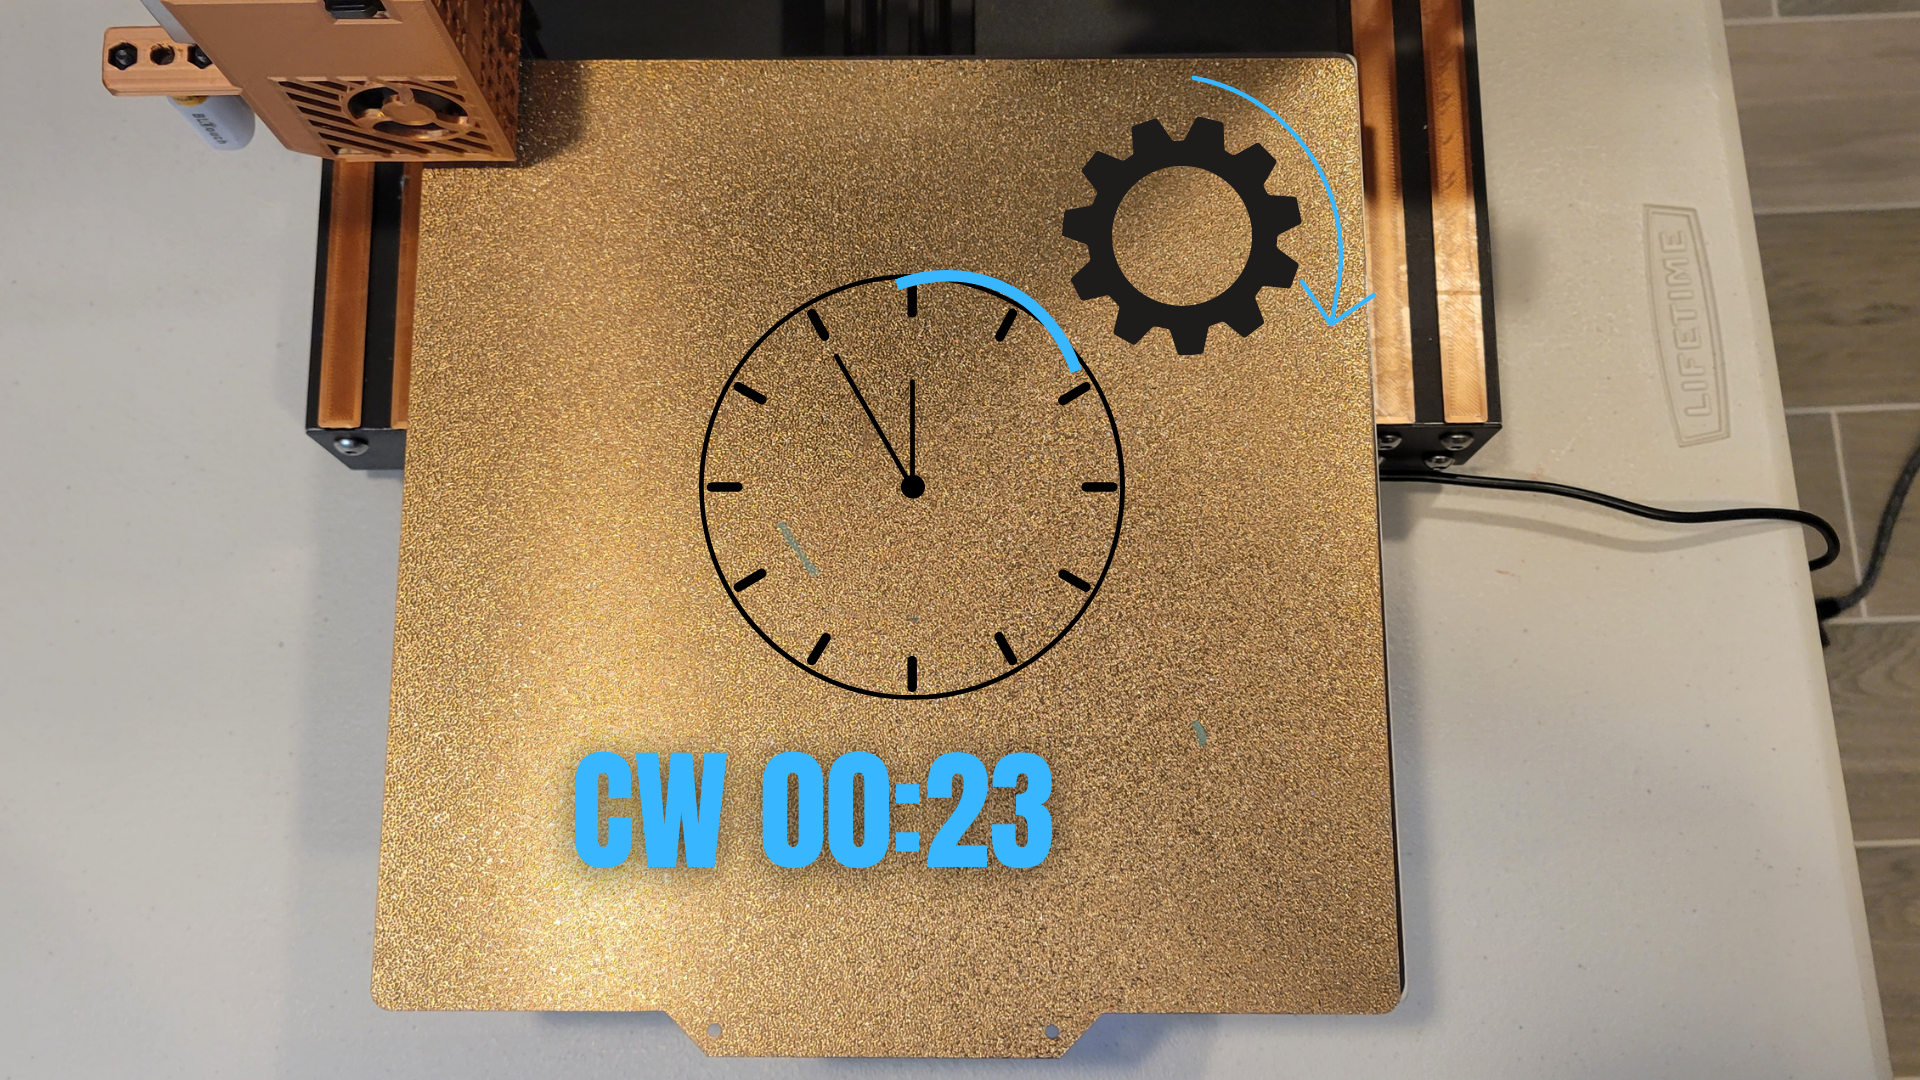
Rear right screw = screw3. Again we see the direction of rotation is clockwise(cw), but this time we will be making a slightly larger rotation of 23 minutes (00:23), which is more than a quarter turn but less than a half turn.
rear left screw[17]

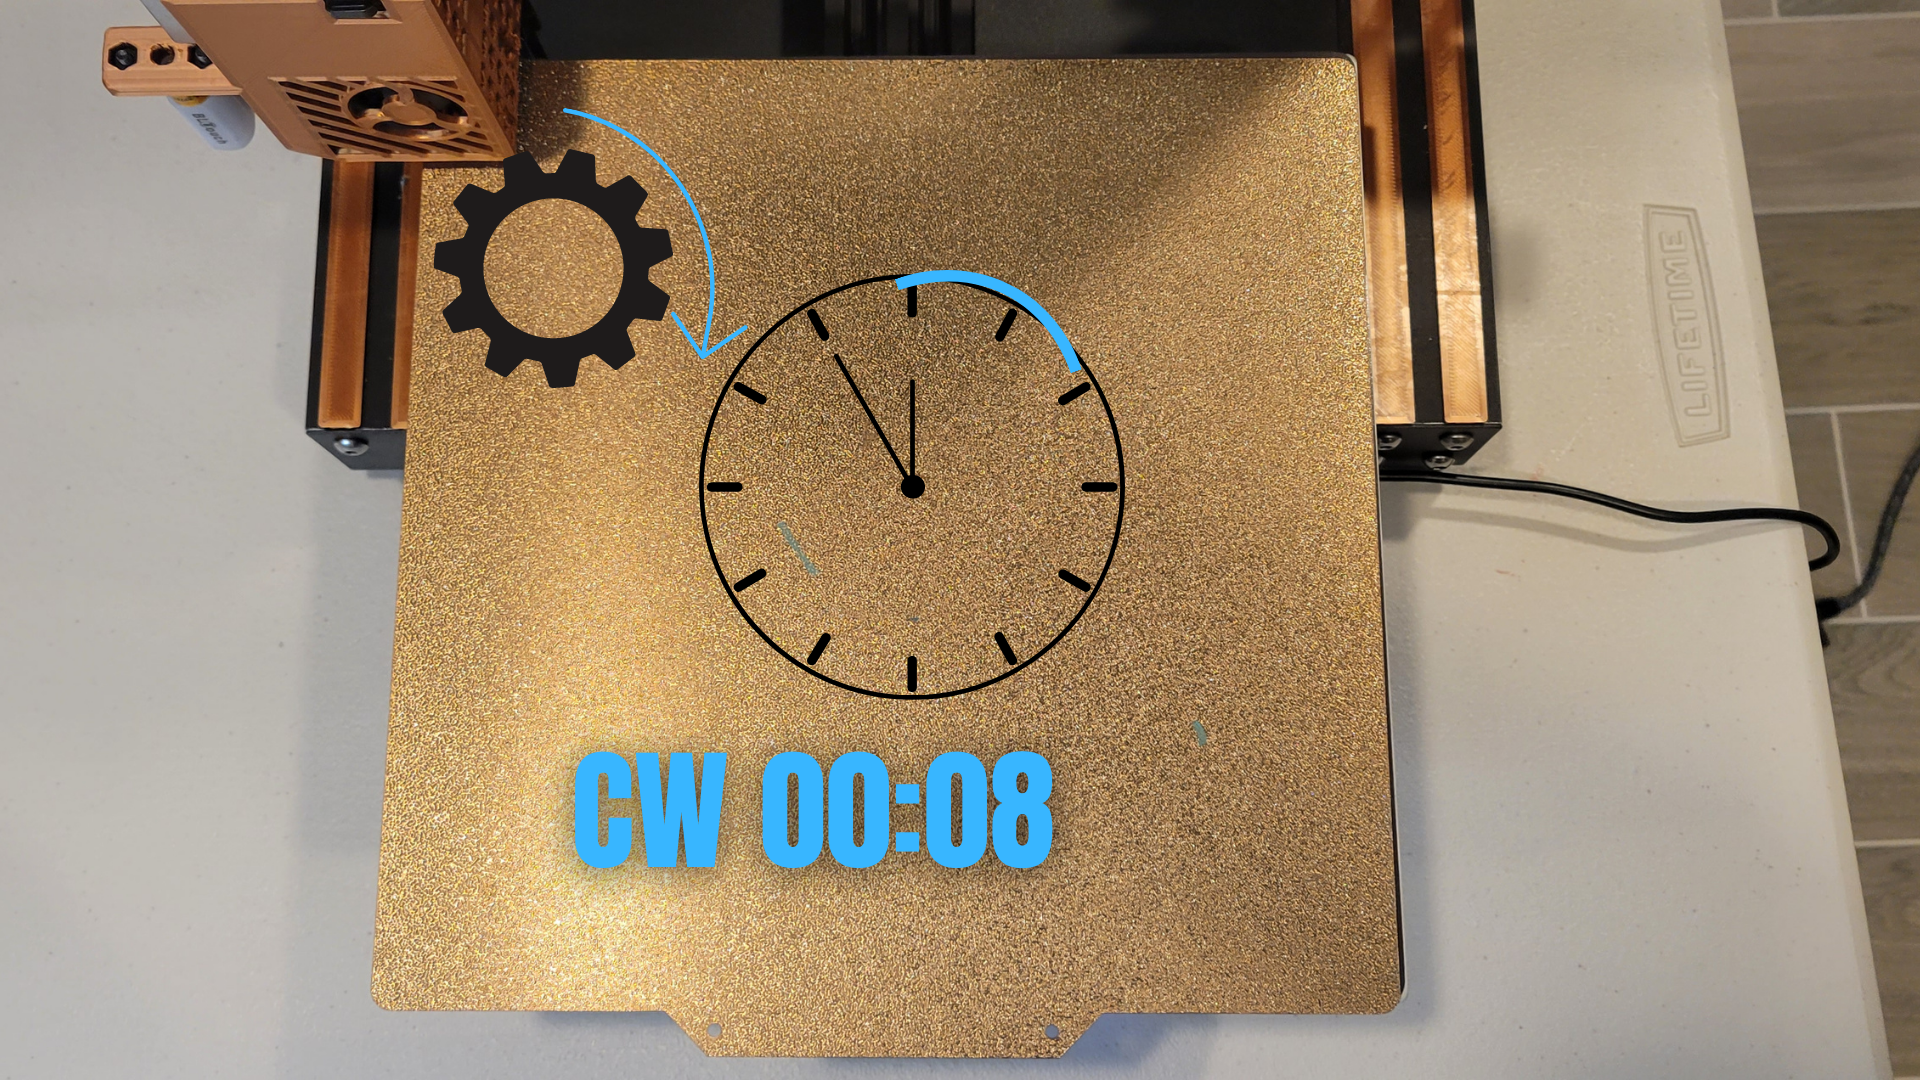
The final screw is what the macro labeled screw4. This screw requires the smallest amount of rotation, only 8 minutes, and again is in the clockwise direction. Hopefully this will not need to be adjusted further after this, however the ‘level’ of each corner is affected by turning and adjusting each other corner.
Rotate, Rinse, Repeat
After going through each screw and making the appropriate rotations, it’s time to run the macro once more and see if we are now at or under the minimum specifications. 6 minutes (00:06) is the point at which no more adjustment should be necessary.

Running the macro a second time[18]
We did pretty good! Granted we did start with a bed that was pretty ‘level’' (all movements under 00:30), but are making progress. At this point I would go to each screw and make all the necessary adjustments, but there are a few things to note. First is the beginning two screws are going to require moves in the counter clockwise (CCW) direction. So be sure to be mindful of the rotation direction after each round of rotations, as it may have changed! Second you’ll notice that rear left screw has an adjustment of only 1 minute, so in that case I would make no adjustment at all (although to be honest I will ‘touch’ the knob, as if that has some magical effect).
Running the macro a third time[19]

All the adjustments are under the 6 minute (00:06) deviation which means we have a properly leveled bed! I would make no further adjustments to the leveling knobs with the exception of the rear left screw (00:04) where I would ever-so-slightly turn it in the clockwise direction, although you shouldn’t need to.

Wrap it up
From saving time to helping those users who have difficulty maintaining their printers, this macro should offer you accessibility and ease of use with no associated price tag. In my above example I only needed to perform the operation three times, making adjustments twice, but keep in mind those results may not be the same for you. Your bed could be further out of adjustment requiring more passes through the macro. It could be more inline with your nozzle, requiring less adjustment. Each scenario will be different so use the above guide as a template and let it direct you according to your printer’s needs. Further I hope this offers some insight on the really interesting and helpful ways Klipper firmware can expand the functions of your 3d printer!